 All operations performed in SourceOffSite are performed from within a
project. All projects created within SourceOffSite are subprojects of a higher level
project. The highest level project is the root project ($/). Creating projects in
SourceOffSite is similar to creating projects in Visual SourceSafe.
All operations performed in SourceOffSite are performed from within a
project. All projects created within SourceOffSite are subprojects of a higher level
project. The highest level project is the root project ($/). Creating projects in
SourceOffSite is similar to creating projects in Visual SourceSafe.
To create a new project in SourceOffSite, first highlight the folder where the new project belongs. Then, choose Create Project from the Source Control group of the Home tab or the right-click menu.
Enter the name of the project and add any comments in the Create Project dialog box and then click OK.
 Files may be added to any existing project. Files may be added one at
a time, several at a time or recursively from the project level.
Files may be added to any existing project. Files may be added one at
a time, several at a time or recursively from the project level.
To add files to a project in SourceOffSite, first highlight the project in the Project List where you want the new files to reside. Then, click Add from either the Source Control group of the Home tab or the right-click menu. The Add Files dialog box will be displayed. If a project is selected from within the file list view, SourceOffSite will add the files and folders into that project, not the project selected in the project list pane.
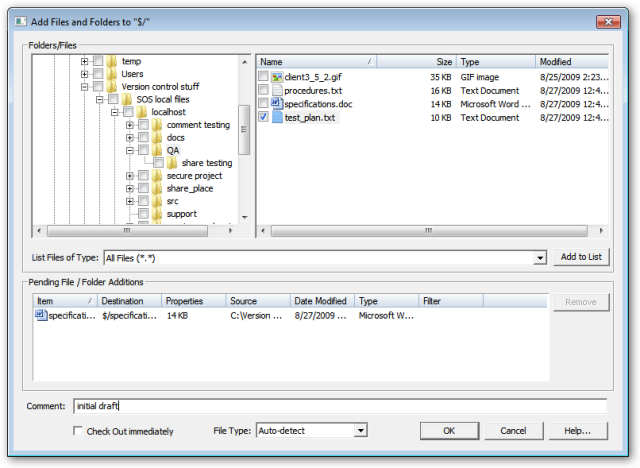
Adding Individual Files
One or more files or folders can be added from within the Add Files dialog box.
To add files, open the folder where the files are located from the Folders list and highlight the check box located adjacent to the desired files.
To filter files based on a particular file type, first set up the filter in the File Types tab of the Options dialog by selecting the filter from the List of file types. Only the files of the selected file type will appear in the Files field.
Enter any desired comments in the space provided at the bottom of the dialog, or select check out immediate if you wish the file to be both added and be checked out to you. Any comments added in the Add Files dialog box will be globally applied to all of the files being added at that time. The file type may also manually be selected. This can later be changed from the Properties dialog if necessary.
Adding All Files and Subprojects in a Folder
To add all files in a folder, select a folder from within the Folders list and select the check box next to every file listed. To add an entire folder, including all files and subfolders, select the check box adjacent to the folder. All subfolders will automatically be checked as well. If you wish to only add one folder without adding any of its subfolders, click the folder name, then expand the folder, and deselect all subfolders.
As with individual files, enter any desired comments in the space provided at the bottom of the dialog, or select check out immediate if you wish the file to be both added and be checked out to you. The file type may also manually be selected. This can later be changed from the Properties dialog if necessary.
Pending List
When you select a file or folder to be added, you may also choose “Add to List” to keep a visible record of the files to be added. If you select additional files to add via the file and folder checkboxes, and press OK, the following dialog is presented.
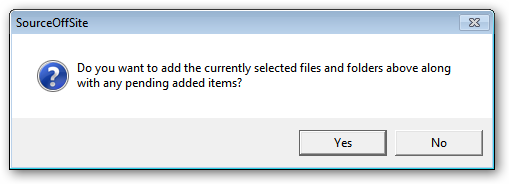
Choose Yes to add selected files and folders items as well as those listed in the pending list. Choose No to return to the Add files and folders dialog box to continue to select or remove files and folders to be added.
 There are two levels of deletion in SourceOffSite: Delete and
Destroy. If a file is shared across two projects, the Delete and Destroy Permanently
commands will only remove the file from within the currently selected project.
There are two levels of deletion in SourceOffSite: Delete and
Destroy. If a file is shared across two projects, the Delete and Destroy Permanently
commands will only remove the file from within the currently selected project.
The Delete command is recoverable as the files will still exist within Visual SourceSafe, but destroy permanently is irreversible.
To delete files or projects in SourceOffSite, select the files or projects from the Project List or File List to be removed. Then, choose Delete from the Source Control group of the Home tab or the right-click menu, and selecting delete. In the dialog present, press OK to delete the listed files.
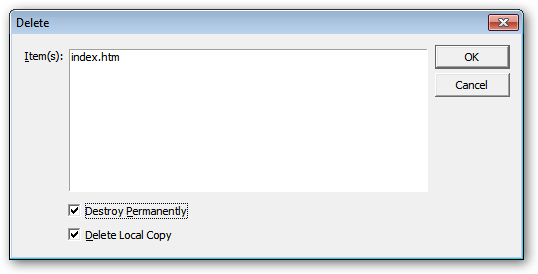
When the Destroy Permanently option is selected from the Delete dialog, the files are unrecoverable. When this option is selected, clicking OK will remove and delete files from the file list and the Visual SourceSafe database. This will free up disk space on the machine where the VSS database resides.
Choosing the Delete Local Copy option will also delete your local copy of the file. If you choose to delete a folder, and select the Delete Local Copy Option, the folder will only be deleted if all files within it are being deleted as well. Otherwise, all files being deleted will be removed, but any other remaining files and the folder containing them will be left intact.
 The Get Latest Version operation retrieves the latest version of
files. By default, files are retrieved in read-only mode. A global option may be set in
the Files pane of the Options dialog enabling the
latest version of files to be retrieved in read-write mode. Files retrieved during the Get
Latest Version operation are copied locally into the current working folder.
The Get Latest Version operation retrieves the latest version of
files. By default, files are retrieved in read-only mode. A global option may be set in
the Files pane of the Options dialog enabling the
latest version of files to be retrieved in read-write mode. Files retrieved during the Get
Latest Version operation are copied locally into the current working folder.
Get Latest Version of Files
To get the latest version of a file, select the file(s) to be retrieved from the File List. Then, choose Get Latest Version from either the Source Control group of the Home tab or the right-click menu. The Get Latest Version operation will copy the files into the current working folder.
One uncommon scenario can occur if version 1 of a file is destroyed and then replaced with a new file with the same name. Since SourceOffSite uses version numbers to determine whether to download a file, the new file would not be retrieved when a Get Latest Version operation is performed. A 'Force file transfer' option has now been added to the file-level Get Latest Version Command dialog. Enabling this option will force the client to retrieve the file, even when the file version numbers are identical..
Get Latest Version of Projects
The Get Latest Version operation may also be performed at the project level. This enables all the files in a selected project to be retrieved.
To get the latest version of all files in a project, highlight the project in the Project List. Then, click Get Latest Version or choose Get Latest Version from either the Source Control group of the Home tab or the right-click menu.
A Get Latest Version dialog box will be presented with the option to perform the operation recursively. If the Recursive check box is selected, then all files in all subfolders will be retrieved during the Get operation. This can be a time consuming operation depending on the number of files and subprojects in the selected project. You can disable this dialog from the Command Dialogs pane of the Options dialog.
A lengthy recursive operation may be stopped by using the Cancel Operation command.
Choosing how to handle locally modified files during Get Latest Version is discussed in the Modified Local Files section.
 The Check Out command enables users to edit specific files locally.
This command locks files or projects within the database. Once files are checked out, the
user who has the files locked is displayed in the User column of the File List.
The Check Out command enables users to edit specific files locally.
This command locks files or projects within the database. Once files are checked out, the
user who has the files locked is displayed in the User column of the File List.
Files retrieved during the Check Out operation are copied locally into the current working folder. A global option may be set to Never Replace Local Copy During Check Out from the Files pane of the Options dialog.
Check Out Individual Files
To perform a Check Out on one or more files, highlight the files in the File List. Then, select Check out from the Source Control group of the Home tab or the right-click menu.
Check Out All Files in a Project
To perform a Check Out on all files in a project, highlight the project. Then, select Check Out from the Source Control group of the Home tab or the right-click menu.
A Check Out dialog box will be displayed containing different Check Out options which include Recursive and Don't Get Local Copy. This dialog can be disabled from the Command Dialogs pane of the Options dialog. If the Recursive option is selected, all of the files in subprojects will also be checked out.
Files retrieved during the Check Out operation are copied locally into the current working directory unless the Don't Get Local File option is selected. For instructions on how to choose appropriate actions with respect to files that are modified locally, see the Modified Local Files section.
Multiple Check Out
SourceOffSite supports multiple user file check out if it has been enabled for the Visual SourceSafe database. For more information on Multiple Users, please see Check In with Multiple Check Outs.
 After a file is checked out and edited, the modifications can be
added to the database by performing a Check In operation.
After a file is checked out and edited, the modifications can be
added to the database by performing a Check In operation.

Check In Files or Folders
To check in one or more files, first highlight the edited files from the File List. Then, select Check In from the Source Control group of the Home tab or the right-click menu.
Select Keep checked out if you would like to check in the current version of the file, yet leave it checked out locally for more editing. Additionally, select Remove local copy to delete the local version after the file has been committed to the VSS database. For folder check ins, a recursive option is available as well to check in all files in the currently selected folder as well as all subfolders.
Check In comments may be added in the Comment field of the Check In dialog. Any comments added at this time will be globally applied to all files being checked in.
Check In with Multiple Check Outs
Here is a complete description of what SourceOffSite does in a Multiple Check Out situation:
-
If the checked out file gets into a Needs Merge state, and the user resolves the merge on the client-side before attempting the Check In, the file will get checked into VSS and become the latest version.
-
If the merge is not resolved on the client-side, upon Check In, the SourceOffSite Server will attempt to do an automatic merge.
-
If there are no conflicting changes, then the Check In operation proceeds with no user intervention. The local version is replaced with the merged version from the Visual SourceSafe database.
-
If there are conflicting changes, the SourceOffSite Server will notify the Client of conflicts and the user will have to manually merge the changes using their configured merge utility.
-
After manually resolving the conflicts, the user can then resubmit the file for check in.
WARNING: Even if the conflicts are not resolved, the next Check In operation performed on the file will overwrite the latest version in the VSS database.
 After a file or project is checked out, it is possible to Undo Check
Out. This operation is convenient if the files are not edited or if the user decides not
to check in an edited file or project.
After a file or project is checked out, it is possible to Undo Check
Out. This operation is convenient if the files are not edited or if the user decides not
to check in an edited file or project.
Undo Check Out of Individual Files
To undo a Check Out, select the file(s) that are checked out. Then, select Undo Check Out from either the Source control group of the Home tab or the right-click menu. The VSS copies of the file(s) will revert to the state before the Check Out operation was performed.
Undo Check Out of All Files in a Project
To undo the Check Out of all of the files in a project, select the project. Then, select the Undo Check Out command from either the Source Control group of the Home tab or the right-click menu.
The Recursive option may be selected on the Undo Check Out dialog box. If Recursive is selected, all of VSS copies of the files in the subprojects will revert to the state before the Check Out operation was performed. Click OK to undo the check out. This dialog box can be disabled from the Command Dialogs pane of the Options dialog.
Local copies
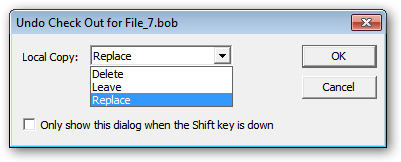
When performing an undo check out, there are three options for how to handle the local copies of the file(s).
-
Delete will remove the file(s) from the local computer
-
Leave will not alter the local copy in any way. Modification done during check out will remain locally. This will cause the file to be of status “renegade," allowing local work to continue without yet checking in any changes.
-
Replace will cause the local copy to be overwritten with the latest version of the file from the VSS database.
Note that when Replace is chosen, the Modified Files dialog will be presented should any local files need to be changed.
When a Get Latest, Check out, or Undo Check Out operation is performed, there may be times when it is necessary to choose how to handle local files that have been modified. For example, if there are multiple "renegade" files, you may wish to overwrite them all with the latest copy from the tree, you may wish to check them out without making any local changes, or you may wish to choose separately for each file.
When retrieving the latest version of a file that already exists on the client machine and may be modified, SourceOffSite offers a number of choices regarding how to deal with potential conflicts.

SourceOffSite can either prompt for each file it encounters when a potential merge conflict exists, or it can overwrite, merge later, or attempt an automatic merge for every file in the current operation.
-
Overwrite the local file with the version on the server (and lose all local changes)
-
Do not overwrite, merge later leaves the local file alone (not retrieving the latest version from the server)
-
Attempt an automatic merge using SourceOffSite’s ability to do a three-way file merge
This dialog is seeded based on the options that are configured in the File pane of the Options dialog. Please note that if "Always Skip files that are checked out and modified" is selected, files that are checked out with a status of "edited" cannot be overwritten. The option to skip modified checked out files takes precedence in all cases. If you want to overwrite a file of status "edited", first disable the checkbox in the files pane of the Options dialog.
If you choose to prompt for each file, SourceOffSite will present a second dialog to give you the choice of how to handle each file it encounters that requires a decision. Note that in some cases when command dialogs are disabled, this modified file dialog may be the first one presented.
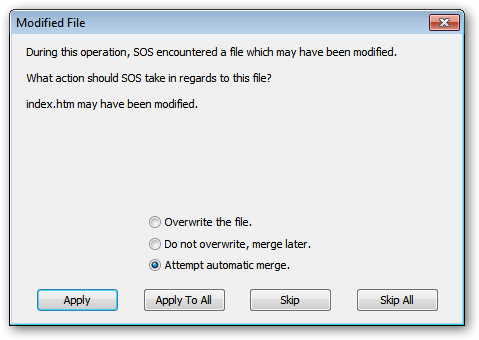
-
Apply will take the course of action selected, and prompt again when the next modified file is encountered.
-
Apply To All will take the course of action selected, and perform that operation on any remaining files encountered that have been modified locally.
-
Skip will not perform any operation on the file in question, but will prompt again when the next locally modified file is encountered.
-
Skip All will end any further attempts to reconcile local changes. The operation will continue on for unmodified files, but not be executed for any locally modified files.
 SourceOffSite enables the current version of a file or a complete
project to be shared with another project in the same way as Visual SourceSafe.
SourceOffSite enables the current version of a file or a complete
project to be shared with another project in the same way as Visual SourceSafe.
To share a single or multiple files in SourceOffSite, select the project into which the file(s) will be shared. Then choose Share Into from either the Advanced Source Control group of the More Source Control tab or the right-click menu. A Share With dialog box will be presented. Either double-click on the file from the File list or select the desired file and click Add. The files to be shared will appear in the Files to Share list in the pane to the lower right.
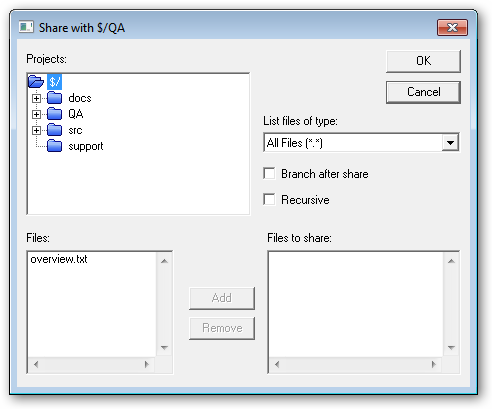
Enable Recursive to share all subfolders. Enable Branch After Share to create shared copies which immediately will have their shares broken. Click OK when finished.
The  symbol next to a file in the File List indicates
that a file is shared. In order to increase performance, share icons can be disabled in
SourceOffSite via Tools > Options > View > Display share icon for shared
files.
symbol next to a file in the File List indicates
that a file is shared. In order to increase performance, share icons can be disabled in
SourceOffSite via Tools > Options > View > Display share icon for shared
files.
 A shared file may be branched in SourceOffSite. After a shared file is branched, the share link is broken and the changes
made to that file are not reflected in other projects.
A shared file may be branched in SourceOffSite. After a shared file is branched, the share link is broken and the changes
made to that file are not reflected in other projects.
To branch a single or multiple shared files, select the file(s) from the File List. Then choose the Branch command from either the Advanced Source Control group of the Home tab or the right-click menu. Add any comments to the Branch Comment dialog box and then click OK.

SourceOffSite allows a user to view the latest version of a file without checking out or replacing the local copy of the file. To view a file, select a file from the File List. Then select View File from either the Source Control group of the Home tab or the right-click menu.
The file editor in both Windows and Unix Clients may be configured in the Default External Programs pane of the Option dialog. In Windows, Notepad is the default. If this box is left blank, SourceOffSite will open files with their associated Windows application.
Binary files are not readable in Notepad. There is no default viewing application configured in Unix operating systems. Choose a viewing and editing application that will open the files most common to the database.
 A file may be checked out and edited in a single operation using the
Edit command. To Edit a file, select a file from the File List. Then, choose Edit File
from either the Source Control group of the Home tab or the right click menu. Files locked
by other users may not be edited unless multiple check out is enabled in the Visual
SourceSafe database. The Edit command will check out the file, if needed, and then open
the file in an editor application.
A file may be checked out and edited in a single operation using the
Edit command. To Edit a file, select a file from the File List. Then, choose Edit File
from either the Source Control group of the Home tab or the right click menu. Files locked
by other users may not be edited unless multiple check out is enabled in the Visual
SourceSafe database. The Edit command will check out the file, if needed, and then open
the file in an editor application.
The file editor in both Windows and Unix Clients may be configured in Default External Programs pane of the Option dialog. In Windows, Notepad is the default. If this box is left blank, SourceOffSite will open the files with their associated Windows application.
Binary files are not readable in Notepad and should not edited in Notepad. There is no default editing application configured in Unix operating systems. Choose a viewing and editing application that will open the files most common to the database.
 The Show Differences operation in SourceOffSite can be performed at
the file or project level. SourceOffSite ships with DiffMerge, a tool that allows you to
compare or merge files and compare folders. For more information about the many features
of DiffMerge, see the DiffMerge manual by selecting help from within the DiffMerge tool.
Alternatively, SourceOffSite can be configured with any diff utility that generates a list
of differences between the local and remote copies of a file or of two specific revisions
of the same file. A project diff utility other than DiffMerge may also be configured for
viewing the differences between the local and remote project structure. SourceOffSite
ships preconfigured to use DiffMerge, but the diff utilities may be reconfigured in the
External Programs tab of the Options dialog.
The Show Differences operation in SourceOffSite can be performed at
the file or project level. SourceOffSite ships with DiffMerge, a tool that allows you to
compare or merge files and compare folders. For more information about the many features
of DiffMerge, see the DiffMerge manual by selecting help from within the DiffMerge tool.
Alternatively, SourceOffSite can be configured with any diff utility that generates a list
of differences between the local and remote copies of a file or of two specific revisions
of the same file. A project diff utility other than DiffMerge may also be configured for
viewing the differences between the local and remote project structure. SourceOffSite
ships preconfigured to use DiffMerge, but the diff utilities may be reconfigured in the
External Programs tab of the Options dialog.
File Level Differences
To see the differences between the local copy of a file and the latest version of the file in the Visual SourceSafe database, select the specific file in the File List. Then, choose the Diff command from either the View group of the Home tab or the right-click menu.
To see the differences between the local copy of a file and any historical version of the file, select the file from the File List. Then choose the Show History command from the View group of the Home tab or the right-click menu. From within the History dialog box, select the historical version of the file and then click Diff.
To see the differences of two historical versions of a file from the History dialog, select two versions of the file and click Diff.
Project Level Differences
To see the differences between the project structure that exists locally and the project structure that exists in the Visual SourceSafe database, select a project from the Project List. Then, select the Diff command from the View group of the Home tab or the right-click menu.
The Recursive option may be selected in the Project Diff dialog box. If the Recursive option is selected, the differences between the subprojects can also be viewed. Click OK to view the project differences.
 When an auto merge fails, or when the user prefers to do a manual
merge, the user can perform a visual merge of the file using the new SourceGear DiffMerge
application or another diff/merge application configured by the user in the Options
dialog.
When an auto merge fails, or when the user prefers to do a manual
merge, the user can perform a visual merge of the file using the new SourceGear DiffMerge
application or another diff/merge application configured by the user in the Options
dialog.
Show Merge
Show Merge allows the user to do a 3-way merge of the file using the configured DiffMerge utility. Changes can be saved to the copy of the file in the working folder.
Resolve Status
Resolve Status allows the user to specify when the merge has been completed and all server modifications have been merged into the local file. When selected, Resolve Merge Status will change the file’s status from Needs Merge to either Edited or Renegade.
 SourceOffSite uses working folders in the same way as Visual
SourceSafe. The Working Folder Setttings command communicates to SourceOffSite where local
copies of the files in that project are located, as well as where they should be placed
when retrieved from the database.
SourceOffSite uses working folders in the same way as Visual
SourceSafe. The Working Folder Setttings command communicates to SourceOffSite where local
copies of the files in that project are located, as well as where they should be placed
when retrieved from the database.
A working folder can be set at any level of the project tree hierarchy, including the root of the tree. Working folders are automatically inherited from parents in the tree. Subprojects may be individually configured to have a different working folder than the parent project.
Just like Visual SourceSafe, if a working folder is not set for a given project or any of its tree ancestors, then SourceOffSite will be unable to determine where the local files of this project are stored. In this case, SourceOffSite will be unable to accurately show the status of files in the File List view.
To set a working folder in SourceOffSite, first highlight the project for which the folder will be set. Choose the Working Folder Settings command from either the Project group of the Home tab or the right-click menu.
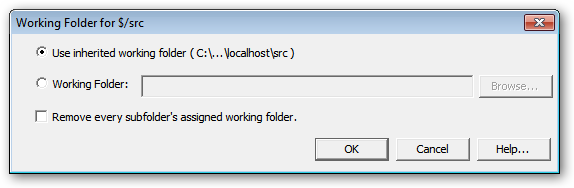
Select a folder from the Folders list in the Working Folder dialog box by clicking “Working Folder,” and then selecting browse. If the desired working folder does not yet exist locally, enter a folder name in the space provided and it will be created automatically.
If a working folder is not set for a child project, the child project will automatically inherit the working folder setting from its parent project. If a Working folder is set for a child project, click "Remove every subfolder’s assigned working folder" in order to cause the subfolder to inheriting its working folder from the parent. Otherwise, leave the box unchecked to permit any child project’s working folders to remain as they are currently set.
Unset Working Folder
A user may wish to unset a working folder if the folder is not part of the parent project's hierarchy. To unset a working folder, first highlight the project for which the folder will be unset. Choose the Working Folder Settings command from either the Project group of the Home tab or the right-click menu. Clear the path in the Name field of the Set Working Folder dialog box and press OK. This project will now inherit a working folder from the parent project if available. Alternatively, working folders can be unset from the working folder tab of the lower pane. Click on the working folder tab of the lower pane, select the working folder to be removed, right click, and choose delete.
Files of status unknown
If the working folder is set to a local folder which already contains files retrieved from VSS or some other means, the files will have a status of unknown. This occurs because SourceOffSite tracks which versions of files it has downloaded, but since the local files haven’t been downloaded by SourceOffSite, it cannot know if they match those in the VSS database. Clearing unknown status can occur in one of two ways. Perform a Get Latest Version on all files is the most straightforward approach. For large directory structures, choose “Use Checksums to Determine Unknown File Status” from the Files pane of the Options dialog. SourceOffSite will then do a checksum comparison of each file to determine if the local copy matches that in the VSS database.
 The File List in the SourceOffSite Client displays a listing of the
current state of the Visual SourceSafe database as communicated by the Server. It is
possible that this list may become outdated as changes happen in the database. It may be
necessary to refresh this view to ensure that information displayed is up to date. The
Refresh File List command will refresh the view of the files list in the current
directory.
The File List in the SourceOffSite Client displays a listing of the
current state of the Visual SourceSafe database as communicated by the Server. It is
possible that this list may become outdated as changes happen in the database. It may be
necessary to refresh this view to ensure that information displayed is up to date. The
Refresh File List command will refresh the view of the files list in the current
directory.
The SourceOffSite Client communicates with the Server for file list information on two occasions:
-
When an automatic refresh operation occurs (optional).
-
The first time a project folder is selected during a session.
Any subsequent time that directory is clicked in that session, the file list information will be taken from a cached file on the client machine located in the users %appdata% directory.
After the SourceOffSite Client is exited and restarted, a new session begins and the process of communicating with the SourceOffSite Server for the file list of each newly clicked directory begins again.
To refresh the file list on an open project, choose the Refresh File List command from the Project group from the More Source Control tab.
It is possible to configure SourceOffSite to perform a Refresh File List automatically through the View pane of the Options dialog. This capability is similar to Visual SourceSafe. However, because SourceOffSite is sometimes used over slow connections, the default setting for the automatic refresh feature is OFF.
Please note: The Refresh File List command is not recursive.
 The project tree view in the SourceOffSite Client displays a listing
of the state of the Visual SourceSafe database as communicated by the SourceOffSite
Server. However, this view may become outdated as changes are made to the database. It
will be necessary to manually refresh the project tree view to ensure that the displayed
information is up-to-date.
The project tree view in the SourceOffSite Client displays a listing
of the state of the Visual SourceSafe database as communicated by the SourceOffSite
Server. However, this view may become outdated as changes are made to the database. It
will be necessary to manually refresh the project tree view to ensure that the displayed
information is up-to-date.
The Refresh Project Tree operation retrieves the most recent folder hierarchy from the Server and updates the tree view accordingly. This operation must be manually performed in SourceOffSite when projects have been added or deleted in the Visual SourceSafe database. The Refresh Project Tree command refreshes the project hierarchy for the currently selected folder and all its descendants.
To refresh the view of the project tree, highlight the desired project. Then, select the Refresh Project Tree command from either the Project group of the More Source Control tab or the right-click menu
The tree must be refreshed a level above the level of the added or deleted projects. Clicking on the Refresh Project Tree button while a parent project is highlighted will synchronize the subprojects in the SourceOffSite Client with the Visual SourceSafe database.
If this command is performed from the root folder, it may be a slow operation as it requires the server to traverse the entire Visual SourceSafe database.
Please note: The Refresh Project Tree command is not executed on application startup. Any changes to the VSS database will require a Refresh Project Tree command to be performed from within SourceOffSite.
 The Cancel Operation command allows the user to stop a lengthy
procedure. Any time the stop button is enabled, the Stop command may be used.
The Cancel Operation command allows the user to stop a lengthy
procedure. Any time the stop button is enabled, the Stop command may be used.
To stop an operation, choose the Cancel Operation command from the Server group on any tab of the ribbon. The Stop command does not undo any part of the procedure that was performed before the Stop command was issued.
When a Cancel command is performed, the client disconnects from the server and then automatically reconnects. This starts a new session. However, this is the only time the File List is not automatically refreshed when a new session begins.