The Pending Change Set tab contains a list of all changes, anywhere in the working folders which are waiting to be checked in to the repository. This provides a constant, visual reminder of items that need to be checked in or committed.
The contents of the Pending Change Set tab will vary depending on your Vault Professional Client options for work item tracking integration. Buttons for item tracking are enabled in the Vault Professional Client under Tools->Options->Integration Options.
The View Change Set button in the Context bar displays the Pending Change Set. The user may choose to enable no integration components, enable either SourceGear Work Item Tracking or AxoSoft On Time defect tracking, or enable both SourceGear and Axosoft integration components.
- SourceGear Work Item Tracking
-
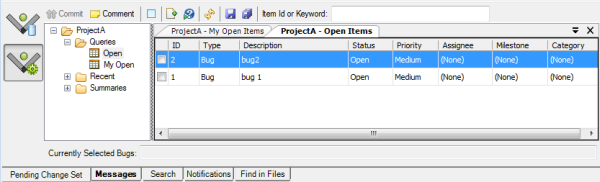
By default, the Vault Professional Pending Change Set tab includes a context bar with the Vault Pro View Change Set button and View Vault Pro Work Items button. Click on the View Vault Pro Work Items button to display Vault Pro item tracking projects and work items. The left pane shows the Work Item Tracking Project view and the right pane displays query results and work items in a tabbed control.
- Axosoft On Time integration
-
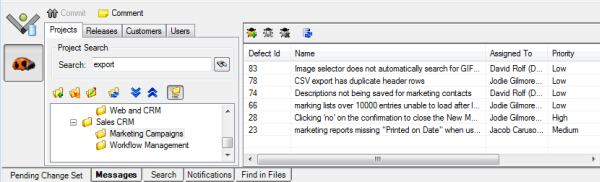
If AxoSoft On Time integration is selected in Integration Options, the OnTime Items button is enabled in the Pending Change Set Context Bar. Click the OnTime button to view OnTime defects. The left pane displays tabs with filters for OnTime Projects, Releases, Customers, and Users. The right pane shows the OnTime Defects list.
- Both OnTime and SourceGear Work Item Tracking
-
It is possible to enable both OnTime and SourceGear work item tracking in the Vault Pro client.
- No work item tracking integration
-
You can disable item tracking in Integration options and no work item tracking features will appear in the Pending Change Set tab.
For users who have the auto-commit option disabled, or who are working in the Vault Professional Visual Studio Enhanced Integration Client or Eclipse IDE client, move, rename and deletes in the Pending Change Set will be reflected in the working folder when they are pended. This allows users to see all the implications of a refactoring operation and correct the build before checking in any changes.
Multiple items can be selected by highlighting the items or checking checkboxes next to the items. Operations will apply to the items selected. Checkboxes in the Pending Change Set can be enabled in the Vault Professional client under Tools->Options->General.
Comments can be created for the entire changeset or for individual items within the changeset. If an item does not have an individual comment associated with its action, the changeset comment is automatically applied to it.
Right-click on a file or folder to bring up a Pending Change Set menu for the selected items.
Pending actions can be undone by selecting the action and hitting the delete key, using the Pending Change Set menu or the Pending Change Set toolbar.
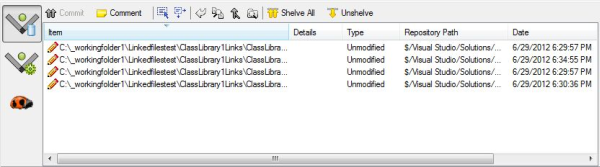
The Pending Change Set tab consists of a list and a toolbar.
The Pending Change Set list contains the following information.
-
Item – The full local path of the file or folder name on which the operation is taking place.
-
Details – For file modifications, this column shows the size of the change (e.g., +9KB or -1KB). If the file has a state of Needs Merged, it is listed here instead of the Type column since the type is Modified.
For folders, the Details column lists the number of folders and files being added, plus the size of all the files being added.
If two users (with auto-commits off) rename the same file, and one user commits the rename, the other user will see Namespace Conflict in red text in the Details column.
-
Type – The type of change. This could be one of the following: Modified, Unmodified, Add, Delete, Branch, Label, Share, Move or Rename.
-
Repository Path – The full path in the repository that corresponds to the item.
-
Date – The local date of the item or the date of the pending item.
-
Comment – The comment that will be applied to this particular item when it is committed / checked in. To change or enter the item comment, right-click on a selected item (or items) to bring up the Pending Change Set menu and click on Edit Item Comment.
The standard toolbar for the Pending Change Set contains the following commands.
-
Commit – The Commit command allows you to Check In/Commit changes to the repository.
-
Comment – You can add or edit the changeset comment. Click OK to accept the comment or Cancel to revert to the comment that already exists.
-
Select All – Click or use the keyboard short cut Cntrl-A to select all the items in the Pending Change Set.
-
Invert Selection – Click to deselec+ any selected items in the Pending Change Set.
-
Undo – The Undo command will undo the selected operation. Modified files are reverted to their previous contents before they were edited, and if the file is checked out, it brings up the Undo Check Out dialog box on the selected item.
-
Show Differences – The Show Differences command brings up the Diff dialog box for the selected file in the list.
-
Show Merge – Brings up the merge window on the selected file. This is only available if the status of the file is Needs Merge or Merged.
-
Rescan working folders – Searches all working folders on the local machine for files that have changed, and puts them in the Pending Change Set if they were not already there. This is available only in CVS mode (when “Require Check Out before Check In” is off)
-
Shelve All – Upload selected changes to the Vault Professional server without committing them.
-
Unshelve – Download a shelveset from the Vault Professional server into your working folder.