Logging On to the Windows Client
How to Log on to the Windows Client
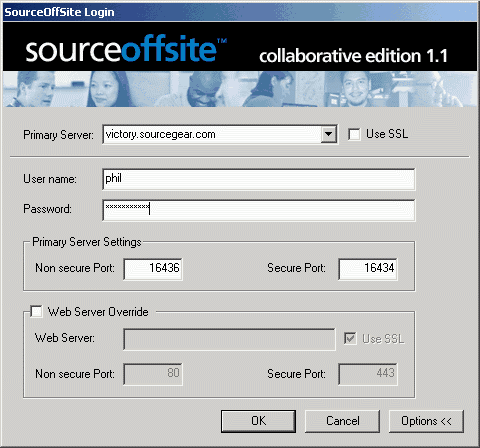
Launch the SOS Collab Windows Client by using the SourceOffSite Collab entry created under the Start menu.
A Connect to Server dialog will appear prompting for a server machine. Select Options > > to expand the window and enter the port number to connect. The server name should be either the host name or IP address of the machine hosting the SourceOffSite Collab Primary Server. The port number is the command port configured in the SOS Collab Server Manager for the SOS Primary Server.
If the user is connecting to a secure (SSL) port, the SSL box on the log-in dialog must be checked. Uncheck the box if using a non-secure (non-SSL) port. Contact your SOS Collab Admin for the correct port numbers for your system.
After logging on the first time, the dialog will already be configured with the server name and port to which the client last connected.
Log in Automatically on Startup
The Windows Client can be configured to automatically log on the last user to the last server. In the Windows Client under Tools->Options->Client Settings, select the option Login Automatically on Startup.
If you wish to connect to a different SOS Collab server after logon, select Connect in the File menu of the Windows Client.
In some network configurations, the SOS Collab Web server may use one IP address and set of ports for external users and a different IP address and set of ports for users within the LAN. In this case, the user would select Web Server Override and enter the Web Server's external IP address and port information. Check with your SOS Collab System Admin to see if you need to use Web Server Override.
Connecting to a Secure SSL Port
Bug Tracking, Discussions and Admin/Setup require use of the SOS Collab Web Server. The Windows Client connects to the Web Server for these functions. When you connect to a SOS Collab Web Server using a secure SSL port, the Windows Client will likely present a dialog warning about connecting to a site with non-authorized certificates.
During the SOS Collab Server Setup, a set of SSL certificates is created. SSL certificates can be authorized by a universally accepted third party, such as VeriSign. If a recognized certificate authority has authorized the certificate, you will not be prompted to verify the Web Server's certificate. If a SSL certificate is not authorized, it does not mean it is not valid -- it only means that the certificate has not passed inspection from an independent third party. This third-party authorization helps prevent "man in the middle" attacks.
If a third party does not authorize the certificate, you can examine the certificate for yourself to see if it is trustworthy. By viewing the certificate information, you should see that the certificate origin is within your own company. Once you know the certificate matches a fully qualified domain name that you recognize as trustworthy, you can install it per the instructions below. In a sense, you become the authorizing agent for this particular certificate.
Once you tell your browser to accept and install the certificate upon an initial SSL connection, then you will no longer see the warning message on that browser.
With Netscape or Mozilla
For Mozilla, click Remember Certificate Permanently dialog. Depending on the version of Netscape, click either Remember Certificate Permanently or Accept This Certificate Forever. Your browser should no longer present certification warnings.With Internet Explorer
When you try connecting to a secure SSL port, a Client Authorization dialog will be presented. If you want to read about SSL and Internet security, click More Info. Otherwise, select OK.Next, a Security Alert dialog will be presented. Click on View Certificate. You should now see certificate information including the name of your company's server machine that issued the certificate. If someone else was trying to pass a bogus certificate, this dialog would reveal it. To install the server certificate, click Install Certificate. Follow the directions within the Certificate Import Wizard.
Once the certificate is installed, it must be configured to be implicitly trusted. From the View Certificate dialog, select the Certification Path tab. Highlight the highest certificate authority (CA) in the chain (CA hostname CA). Select View Certificate and then click Install Certificate a second time. Press OK to return to the original Security Alert warning and click Yes. At this point, Internet Explorer should no longer present certification warnings.
(Please Note: If the certificate was generated on a given machine and that certificate header referred to a hostname that does not match the machine name, the procedure above will not stop the warning dialogs from appearing. For example, this could happen if the certificate machine was renamed. In this case, the best choice would be to regenerate certificates. This procedure is somewhat involved.)
If a user forgets their password, the SOS Collab System Admin must reset the user's password. Contact your SOS Collab System Admin for a new password.
If the user knows their password but wishes to change it, they can do so through the Tools > Change System Password menu option