Set Up Groups
This function is available only to SOS Collab Admins or Project Admins.
Groups in SOS Collab Edition help define access to project data for a set of users such as managers, development team members, QA, or marketing members, etc.
When a SOS Collab Project is created, two groups are automatically created for that project: a Project Admin group and a Developers group. By default, the Project Admin group has Administer rights and the Development group has See/View/Read and Modify/Add/Update rights.
Any number of other groups can also be created and associated with a project. Only the System Admin or the Project Admin for a project may add, modify, or delete a group in that project. When a new group is created, it has no default rights and must be given appropriate access rights to the project data.
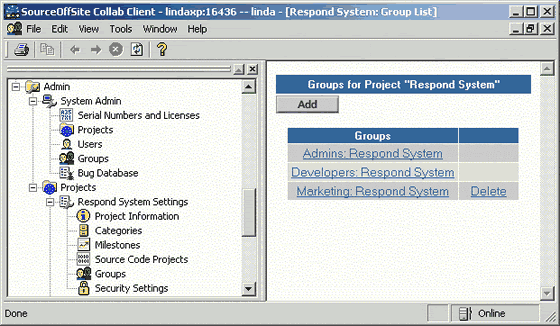
Accessing Group Setup through the Windows Client (Admins)
(Please Note: Project Admins access Groups in the Windows Client through the Admin>Projects node of the Project Tree.)
To access group setup through the Windows Client, expand the Admin node in the Project Tree. Under System Admin, select Groups. This will bring up the same Groups page as the Web Client.
From this page, the admin can add, modify, or delete groups.
Accessing Group Setup through the Web Client (Admins)
(Please Note: Project Admins do not see the Admin section of the Server Home page. Project Admins access Groups in the Web Client from the Project Admin link on their project page.)
To access group setup through the Web Client, click Groups under the Admin section of the Server Home page.
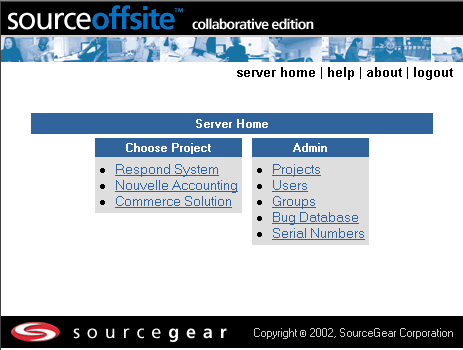
This opens the Groups page which contains all of the defined groups.

From this page, the admin can add, modify, or delete groups.
From either the Web Client or the Windows Client, open the Groups page which contains all of the defined groups.
To add a new group and associate it with a project, click the Add button. This brings up the Add a Group page.
Fill in the Name of the group and select a Project from the drop down list with which to associate the new group. Then, click Submit. The new group will be added to the list of groups. Give the new group See/View/Read and Modify/Add/Update rights with Project ACLs.
Once a group is created, you can add or delete users from that group.
From either the Web Client or the Windows
Client, open the Groups page.
Click on the group name from within the Groups page to see a list of usernames. This shows the users who are currently members of that group.
Click on the Modify button to add or delete users assigned to that group.
Select Delete next to a user to be removed from a group. Alternatively, you can select a username from the drop down list and click Add to subscribe that user to the group.
From either the Web Client or the Windows Client, open the Groups page.
Groups can be deleted by pressing Delete next to the group to be removed. This will display a page that asks if you are sure you want to delete the group. Choosing Delete will remove the group and all ACL information associated with the group. Selecting Cancel will leave the group intact.
(Please Note: The Admin and Developer groups created by the SOS Collab system cannot be deleted.)
Users are assigned to groups through the Groups page by modifying users in a group.